m |
|||
| (13 intermediate revisions by 3 users not shown) | |||
| Line 1: | Line 1: | ||
| + | <noinclude><translate><!--T:2--> | ||
| + | </noinclude> | ||
{{Knot | {{Knot | ||
| − | |||
| name = Man harness knot | | name = Man harness knot | ||
| − | | use = The '''Man harness''' is a knot with a loop on the bight for non-critical purposes. | + | | image = ArtilleryLoop FinalKnot.jpg |
| + | | image2 = ArtilleryLoop_HowTo.jpg | ||
| + | | use = The '''Man harness''' is a knot with a loop on the bight for non-critical purposes. This knot is used when multiple people are to pull a load. Typically one end of the rope is tied to a load, and one man harness knot per puller will be tied along its length. Each loop is then pulled by a different person. | ||
| warnings = The Man harness knot must have the loop loaded or it will slip and contract easily. | | warnings = The Man harness knot must have the loop loaded or it will slip and contract easily. | ||
| tying_instructions = | | tying_instructions = | ||
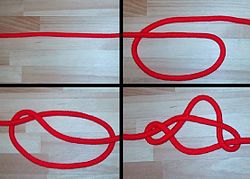
| − | + | # Lay the rope flat | |
| − | + | # Make a loop in the rope with the running end going beneath the standing part. | |
| + | # Pull the running end down so that it crosses over the loop. | ||
| + | # Pull the bottom of the loop through the gap between the top of the loop and the running end. | ||
}} | }} | ||
| + | <noinclude></translate></noinclude> | ||
Latest revision as of 19:26, 25 July 2022
| Man harness knot |
|---|
|
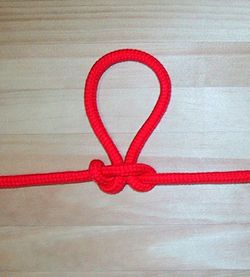
Use: The Man harness is a knot with a loop on the bight for non-critical purposes. This knot is used when multiple people are to pull a load. Typically one end of the rope is tied to a load, and one man harness knot per puller will be tied along its length. Each loop is then pulled by a different person.
How to tie:
WARNING: The Man harness knot must have the loop loaded or it will slip and contract easily.
|


